Bloggers Guide to WordPress Security
By the end of this guide, you’ll know absolutely everything there is to know about WordPress safety and security, from better password habits to modifying the default WordPress configuration files. Whether you’re trying to become a blogger or creating an immense magazine of content, you’ll be able to rest assured that your data, your site, and even your users are protected.
Roughly 30,000 websites are hacked every day. Could your website become one of them? In a perfect world, using a popular content management system like WordPress would end many security woes — but unfortunately, that’s not the case. By default, WordPress isn’t very well secured; it’s built to publish content easily, not necessarily to protect it. If you want to protect your content as a blogger, you’re going to need to take some extra steps.
But becoming a blogger shouldn’t mean that you have to be some sort of technical savant, particularly if you’ve just started a blog. You’re a content producer, not a hacker. Because of that, we’ve compiled a complete, all-in-one guide to “hardening” and protecting your WordPress blog. And it’s a little long — but most of the steps that you’re going to have to take are only going to have to be taken once.
Why Do I Have to Secure My WordPress Account?
It’s a blog — not a bank account! Why would anyone try to hack your site? It’s easy to assume that your one blog isn’t going to become the target of a serious attack, but, in truth, there are more reasons for a cybercriminal to target you than you might think. WordPress blogs are frequently hacked for the following reasons:
- To collect your personal information — or the information of your users. Identity theft is a big reason why a cybercriminal might go after a well-trafficked blog. You don’t even need to collect a lot of information to make this viable: the criminals may only be seeking to collect email addresses. They can sell active email addresses to advertising companies or use them as their own spamming lists.
- To post “black hat SEO” web pages. If your website is currently a highly ranked website (or even a moderately ranked one), a cybercriminal may want to take over your website domain so that they can post their own content on it. This is very similar to domain hijacking, and it’s designed to leverage the popularity of an existing website in order to sell goods and services, spread malicious programs, or point to affiliate advertising.
- To steal your website and hold it for ransom. Yes, this happens. And it’s usually not obvious. No one jumps out at you from a digital alley and says, “$30, or the website gets it!” Instead, they throw a splash page on your website that says that it’s been hacked and then direct you to services that you can purchase that will restore your website… all under the guise of “helping” you from the evil cyber criminals. This works because many people don’t back up their websites, so they can’t restore their content themselves.
- To embed malware and malvertising. Some people just want to watch the world burn. A cybercriminal can pull off a rather subtle attack by simply embedding malware and malvertising into your website. Your website will still be up — so you may not notice that it is currently distributing malicious programs to your users (likely including yourself). Eventually, however, search engines are going to notice, and your website is going to be blacklisted.
- To simply take your website down. DDoS attacks are one of the easiest ways that a cyber-attacker can take a website down. This can happen for a variety of reasons: the attacker may be a competitor, the attacker may disagree with your positions, or the attacker may be trying to use it to gain access to your website by exposing other vulnerabilities.
Apart from this, your website can also be targeted as part of a larger attack. Criminal attackers may simply be scanning for vulnerable WordPress accounts — because they already know about the vulnerabilities that exist in WordPress, especially given WordPress’s rise to dominance in the world of website builders. They may simply attempt exploits on all of the websites they find, hoping to recover something of usefulness and interest.
So how do you avoid becoming a target? It all begins with the setup.
Chapter One: Setting Up and Configuring Your WordPress Installation
WordPress is in the business of making it easy for you to post your thoughts and experiences. It isn’t necessarily in the business of securing them. The default configuration of your WordPress installation makes it very easy for you to use, but it also makes it easier for others to access. Before you even begin fiddling with your first post, you need to change some settings.
Change Your Administrative Username
By default, WordPress sets your username to “admin.” This is a problem: in order to log in, someone only needs to guess your password. But you can defeat this by having a username that is different, and that is not visible to the public.
In WordPress, you can’t directly change usernames; instead, you have to create a new username and delete the old one before you begin. That makes it a little more complicated, but this is as good a time as any to become familiar with the administrative settings dashboard.
How to Change Your Administrative Username
On the administrative dashboard, click on “Users.” You’ll retrieve a list of current users, which should be only a single user named “admin.”
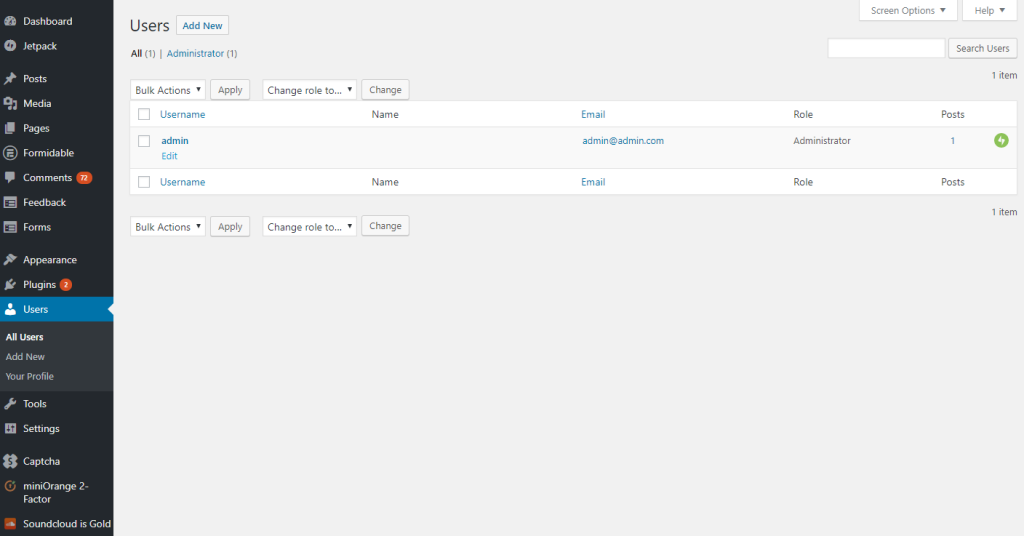
Next to the Users heading, click on the “Add New” button.
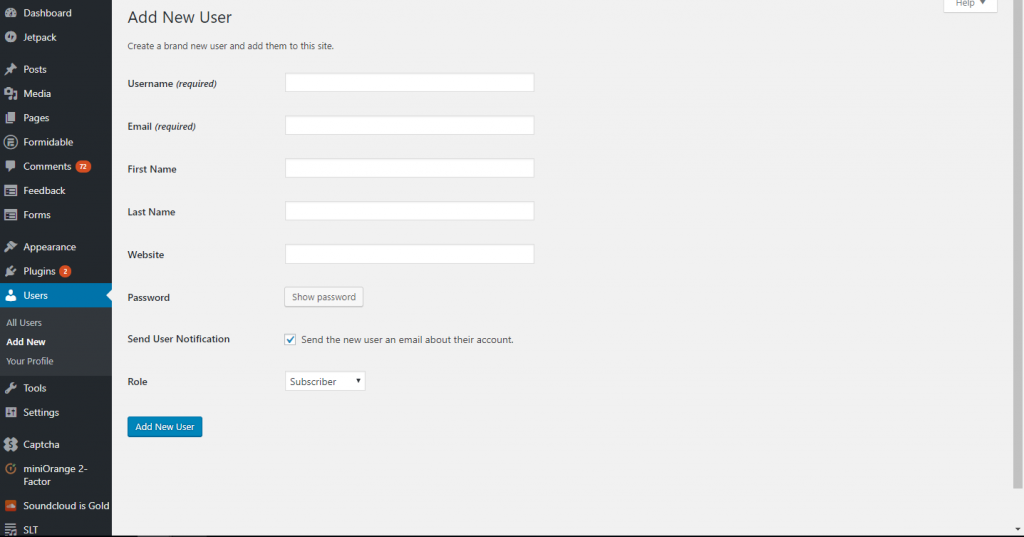
Fill in your user information as directed and select the role of “Administrator.” Click on “Add New User.”
Hover on the old “admin” user name. Click on “Delete.”

Confirm deletion.

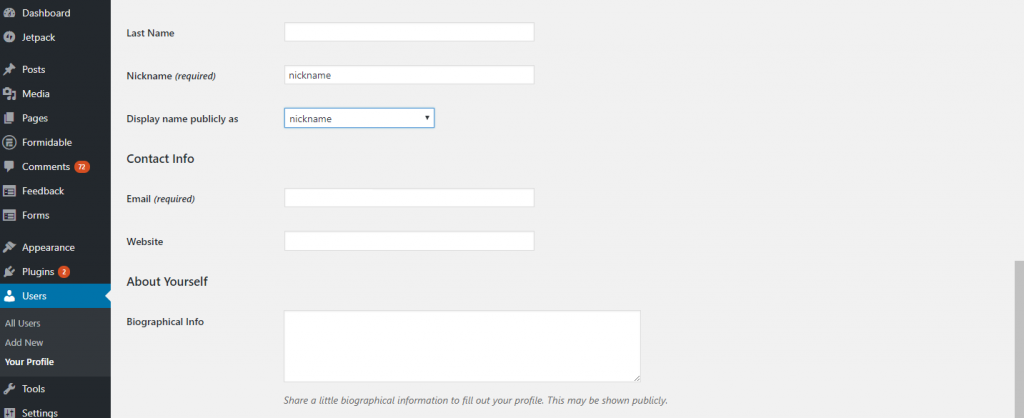
Click on your new administrator name.
Scroll down to change the nickname and select to “display name publicly as” this nickname.
Add Two-Factor Authentication
Two-factor authentication adds an additional layer of security to a traditional username and password combination. Think of two-step authentication as a lock in which you have to turn two separate keys. One of these keys is your login credentials — your username and password. The other key can be either of the two following options:
- “Something you are.” A fingerprint scan, eye scan, or another biometric service can be used to verify that a user is who they say they are. This is frequently used to lock phones, doors, and other physical devices.
- “Something you have.” A smartphone or similar device can be used to verify a user’s identity. Frequently this means sending the user an SMS message with a PIN. The user then has to enter that PIN alongside their login credentials.
Two-factor authentication can only be set up natively on WordPress.com. Otherwise, it requires the use of plug-ins such as MiniOrange 2FA, Google Authenticator, and Sucuri.
Installing Two-Factor Authentication With Google Authenticator
Go to Add Plug-Ins and select “Add New.”
Search for “MiniOrange Google.”
Click “Install” and then “Activate.”
MiniOrange will send you an email to verify your email.

Then, you can set up your account.
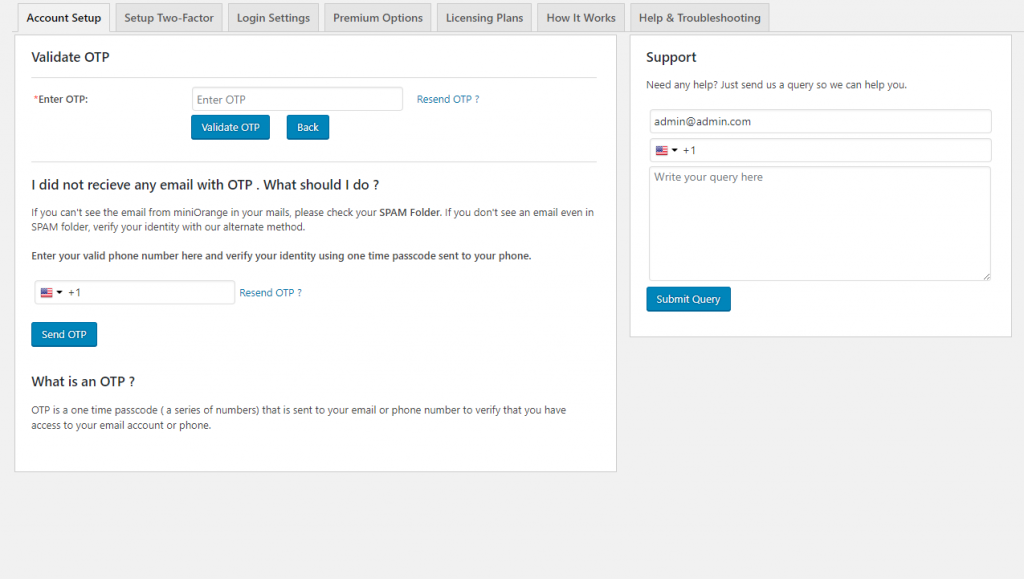
Select the 2fa Tab to select a type of two-factor authentication. The simplest and most secure method is Google Authenticator. MiniOrange also offers premium versions, including SMS, as well as less secure via email.
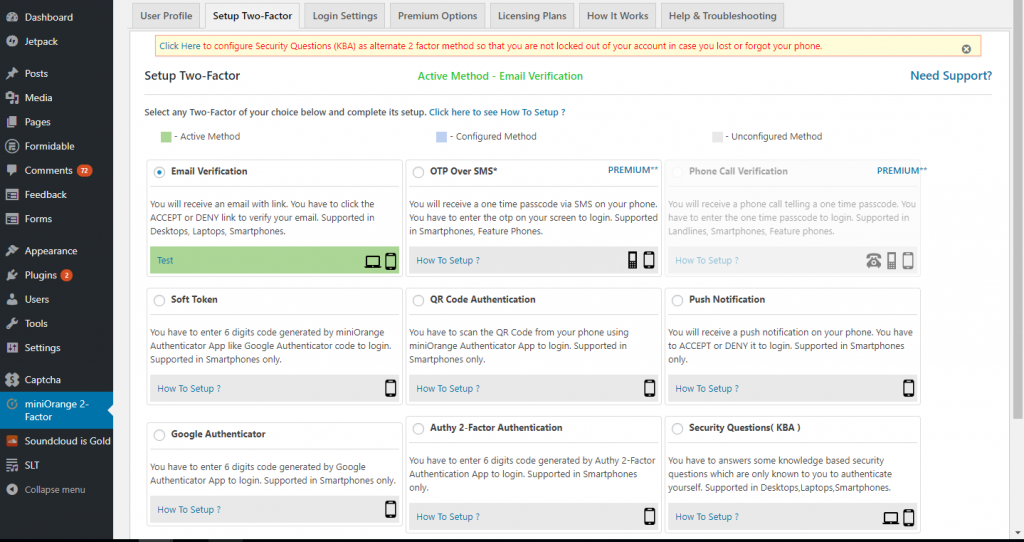
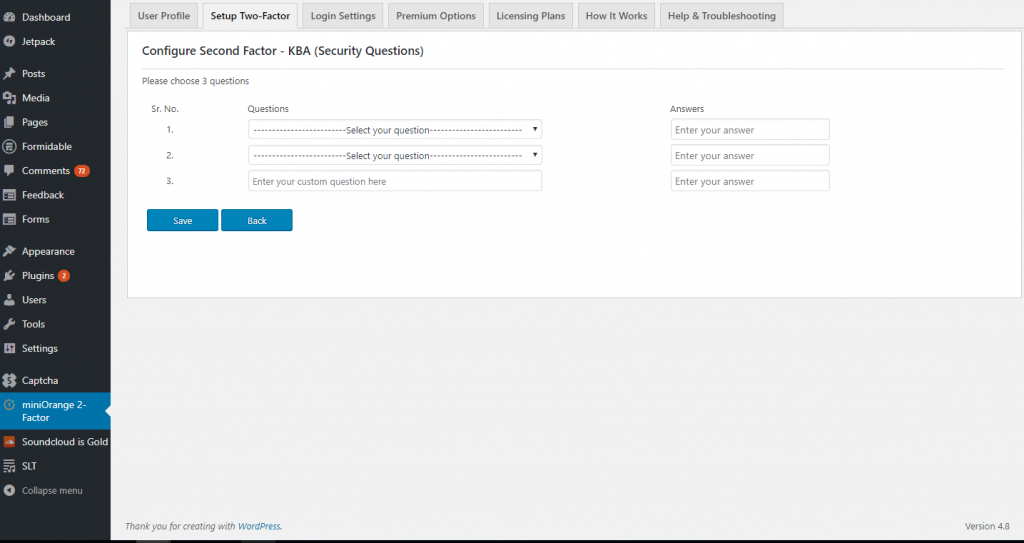
Click on the alert to configure security questions, which will ensure that you do not get locked out of your account.
(Optional) You can also set up which roles have two-factor authentication.
WARNING! Using WordPress’s optional Jetpack, it’s possible to connect your own WordPress website to your WordPress.com login. From then on, you can log into all of your WordPress sites through your WordPress.com credentials. This is not advised. If one of your sites is compromised, all of your sites will be compromised.
Install a CAPTCHA Solution
Everyone knows CAPTCHA. CAPTCHA prevents bots from performing actions on your site, such as trying to log in or trying to submit a form. A bot can be very persistent: not only can they eventually break through your security, but they could overly tax your website, resulting in denied traffic and slow connections.
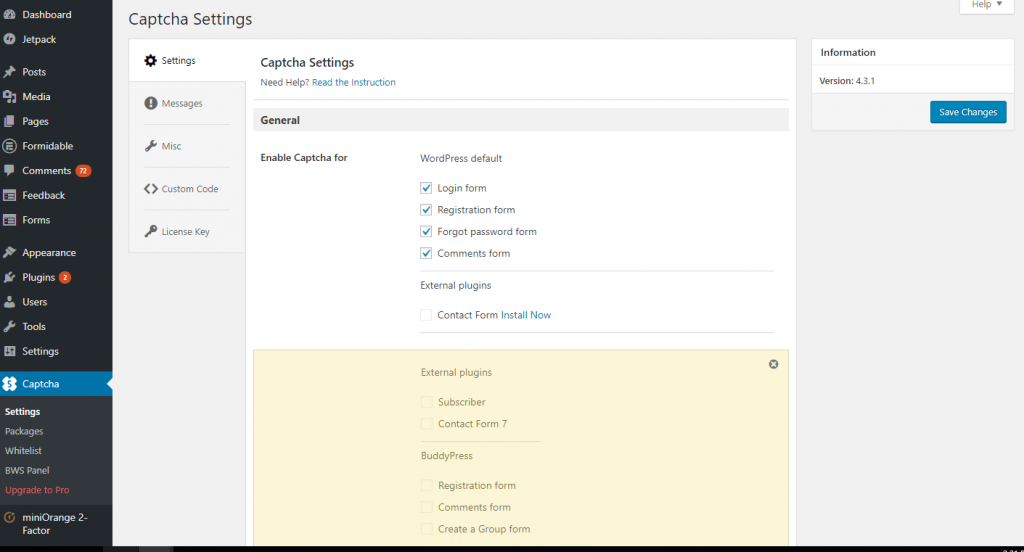
Though some CAPTCHA systems can seem a bit “annoying” — such as the ones that are difficult to read — they can be essential for high-volume blogs. The CAPTCHA WordPress Plugin lets you add CAPTCHA controls to login forms, registration forms, comments forms, contact forms, and more. Further, you can control the type of CAPTCHA code that’s displayed so that it has a limited impact on your legitimate users.
Installing a CAPTCHA Solution
Go to Add-Plugins and Select “Add New.”
Search for “Captcha by BestWebSoft.”
Click on “Install.”
Review Captcha Settings. Enable Captcha for login forms, registration forms, forgot password forms, and comment forms.
Save changes.
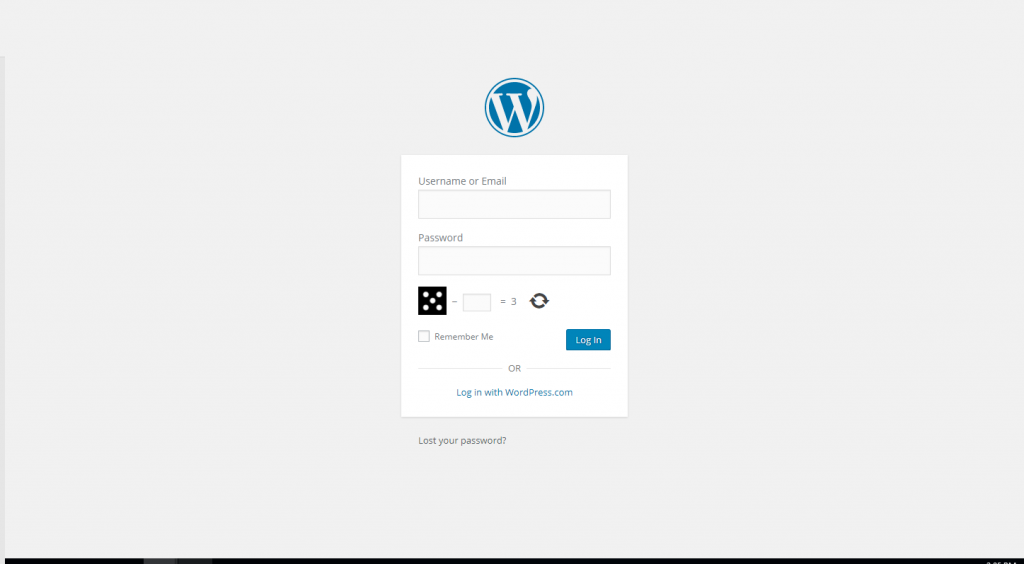
From now on, when you log in, you’ll be greeted with a captcha code.
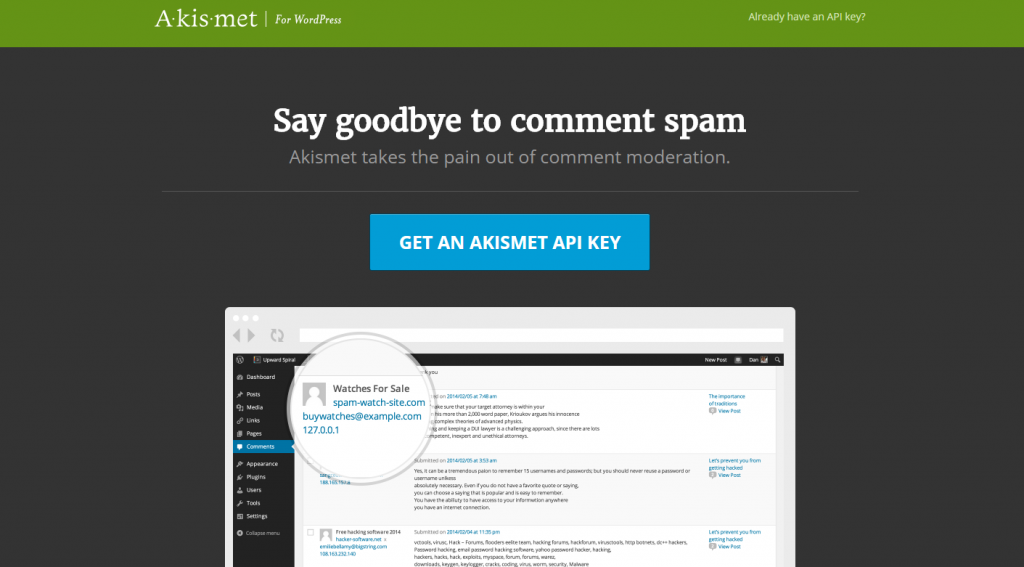
Get Spam Protection for Your Comments
At first glance, spam protection seems more like a usability issue than a security issue. “Spam” comments generally come from bots who are seeking to boost the website rankings of other websites. Bots will generate “word salad” comments that have nothing to do with your posts but ultimately link to the site that they are promoting.
Where it becomes a security issue is two-fold: spam comments can bog your blog down with excess traffic, and they can contain potentially malicious links. WordPress does not have built-in spam protection, but it is provided for free through the Akismet WordPress plug-in. There are also some other options, such as the official WordPress security plug-in and all-in-one systems like Sucuri.
Installing the Akismet WordPress Plug-In
Go to Add Plug-Ins and select “New.”
Search for “Akismet.”
Install and activate the Akismet plug-in.
Click on “Set Up Your Akismet Account.”
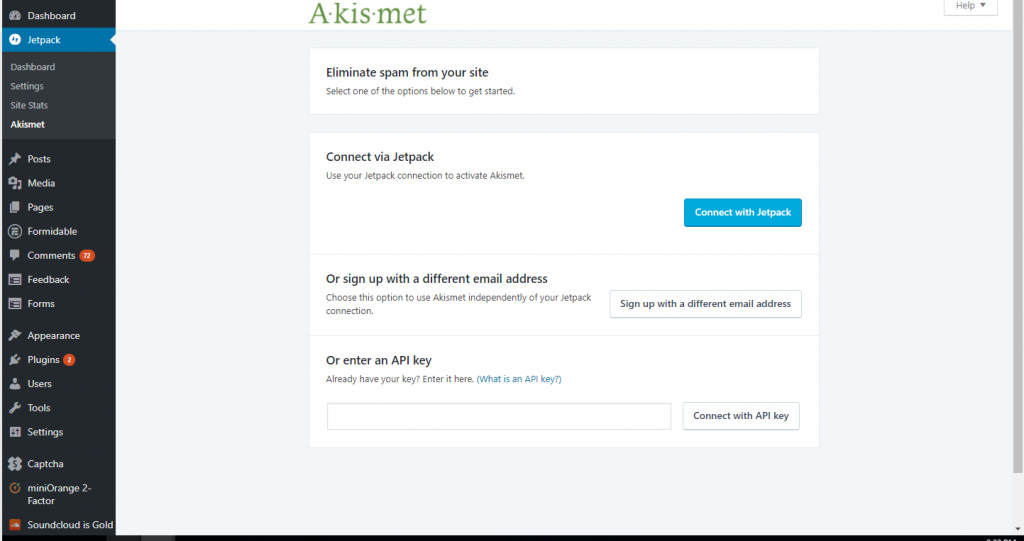
Click on any of the options.
Get an Akismet API Key for free.
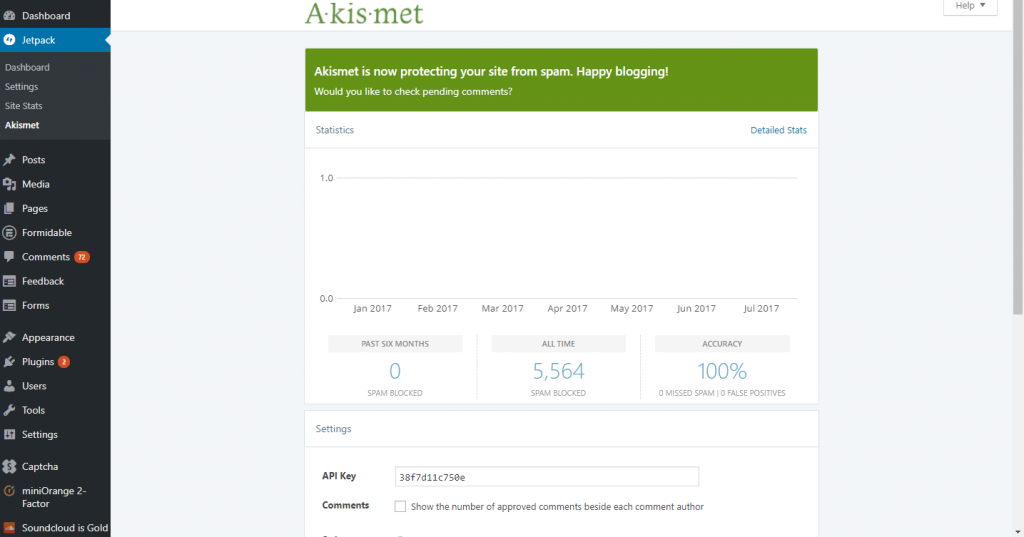
Go to the Akismet Settings and enter the Akismet API Key. Spam protection will begin instantly.

Remove Your WordPress Version Number
WordPress telegraphs the version number that you have installed for the world to see. While this might be interesting information, it can also be harmful. A malicious user could see that you’re using a version of WordPress that still has a certain vulnerability — and they can then target you. The easy solution? Just remove the number.
This takes a bit of editing, so remember to back up your website first. Once your website has been backed up:
Go to “Appearance” and then “Editor.”
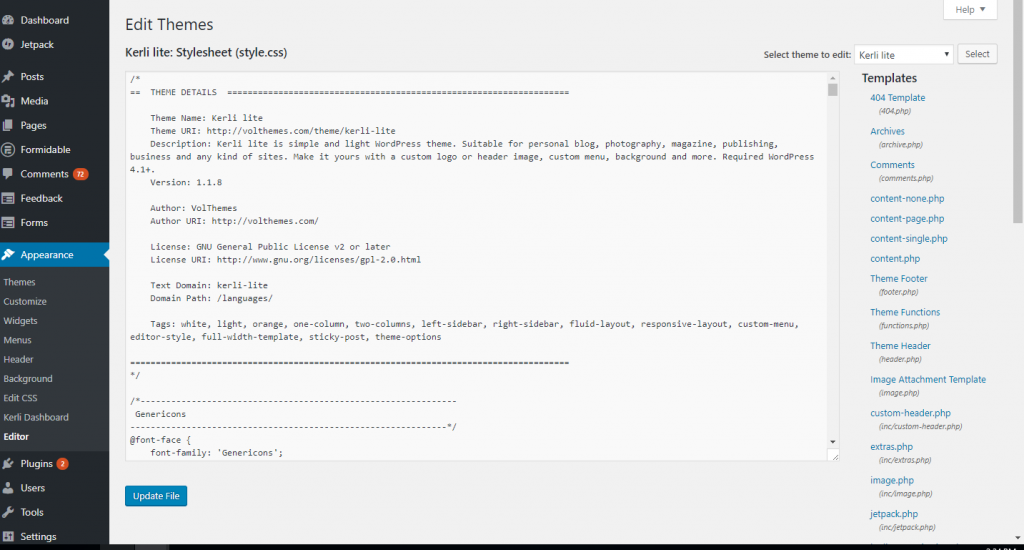
Go to the right and click on “Theme Functions” (also labeled “functions.php”).
Note that some more advanced themes may have a custom functions file. Consult your theme documentation for more details.
Type “add_filter(‘the_generator’,”);
This is WordPress Code that adds a filter to the part of the WordPress library that displays your version, thereby preventing it from being displayed.
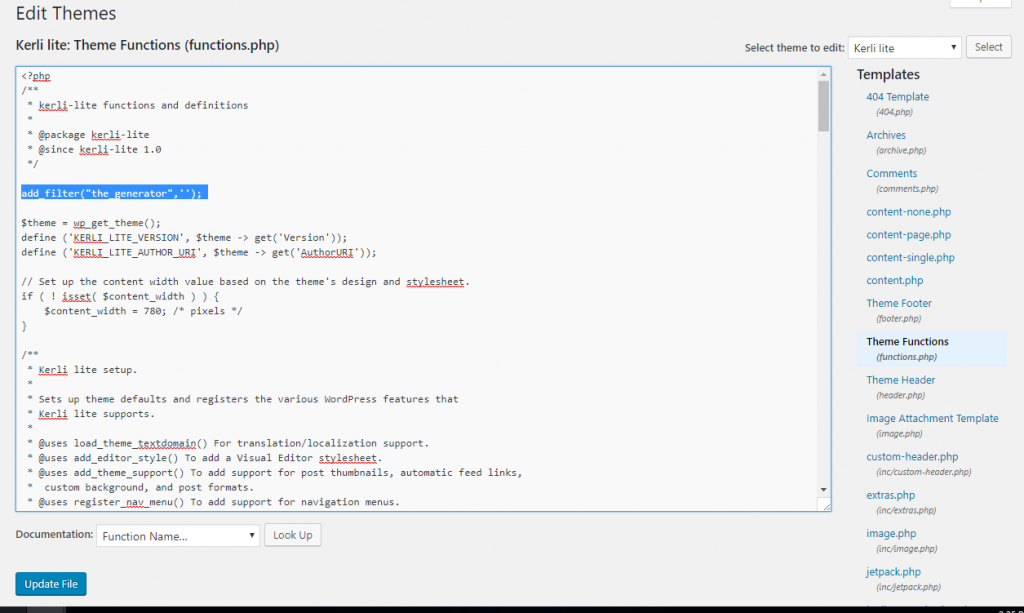
Click on “Update File.”
This will strip out your version number from your WordPress header and from your WordPress RSS feeds at the same time. Now you just have a few more adjustments to make.
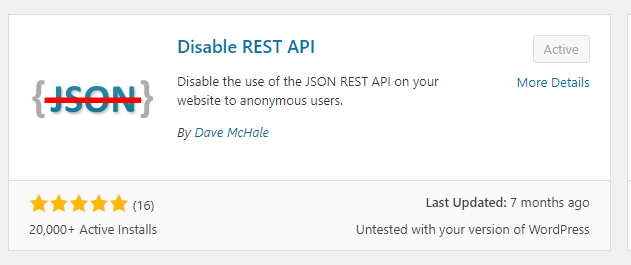
Disable the WordPress API
WordPress offers a REST API for developers who want to integrate their own programs into WordPress. However, there are some issues with the REST API — most notably that the REST API can actually bypass WordPress’s authentication system, including two-factor authentication. Unless you are using it for a custom-built application, it’s a solid practice to simply disable the WordPress API entirely. This can be done through a plug-in, such as Disable REST API.
All you need to do is “Install Now” and then “Activate.”
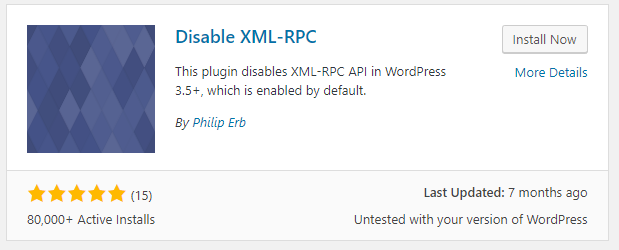
Disable XML-RPC
XML-RPC is a special WordPress feature that enables remote access and posting. This can be a security issue, as it creates another way that a malicious user could potentially access your site. If you’re interested in publishing posts remotely, you may need to leave XML-RPC enabled (it is enabled by default). If you are not publishing posts remotely, there’s no way to add an additional vulnerability.
The easiest way to disable XML-RPC is to install the Disable XML-RPC plug-in. Though there are other ways, it would require modifying the code of a different plug-in.
Again, all you need to do is click on “Install Now” and then “Activate.”
Chapter Two: Passwords and Password Hygiene
So far, many of the changes that we have made have been designed to counter security issues in the WordPress platform itself. But the platform only represents half of the risk. An equal amount of risk comes from the user — and, unfortunately, that’s you. There are many ways you could potentially (and accidentally) create your own security vulnerabilities. One of the major ways lies in passwords.
As of the most recent versions, WordPress Core actually requires “strong” passwords by default. That means that WordPress won’t let you set a password that its own algorithm deems too weak — and that’s a good thing. But there are still some things you should know about how passwords protect you and how you can protect them.
Crafting a Strong and Memorable Password
What makes a password good? A good password is both complex and easy to memorize. WordPress will make sure that your password is complex, but the passwords that it automatically generates are most definitely not easy to memorize — in fact, they’re generally impossible to remember. That can lead to people foregoing the automatically generated passwords altogether and attempting to make their own.
Complexity is important because the more complicated your password is, the less likely it is to be guessed by an intruder. But memorization is also important; if you can’t remember your password, you’re more likely to save it in an app, write it down in your notepad, or simply reset it the first time you forget what it is.
Most people do not choose good passwords. To understand what makes a good password, let’s use an example:
- “shells” – This is an obviously bad password. It’s a single dictionary word. It can easily be guessed, especially if there’s some reason for choosing the word shells. And you might think, “what person is going to guess ‘shells’?” But people are rarely used for this process. Instead, automated scripts are used to go through an entire dictionary worth of words to eventually find the right one.
- “sh311s” – This is often considered to be a good password, but it really isn’t. It’s not long enough, and the complexity is simply confusing — you’ll find yourself wondering whether you used an ‘e’ or a ‘3’. To a computer, “shells” and “sh311s” are functionally identical.
- “#Sh@*zHQWoa*” – This is the type of password that’s usually provided through auto-generation. In practice, it can be useless; it’s only helpful if saved in a password manager, which opens the door to other security issues entirely.
- “She_sells_sea_shells.” – This is actually the best password on this list (well, assuming it wasn’t part of a very popular nursery rhyme). It is long, complex, and easy to remember.
Complexity doesn’t mean that your p4ssw0rD has to look complex to you; this is a common misunderstanding. Instead, complexity goes up exponentially by length — and longer pass “phrases” are generally easier to remember and impossible to easily guess.
Practicing Good Password Hygiene
mainEvery morning you probably brush your teeth, floss, and wash your face — though may not be in that order. But just as you need to practice good physical hygiene, you also need to practice something called good password hygiene. In IT, good password hygiene means maintaining your passwords properly… and making sure they aren’t unnecessarily exposed to risk. Password hygiene is called hygiene because it requires the development of good habits.
- Always memorize your passwords. In the prior section, we discussed why making passwords memorable is important. Even if you have to use some sort of mnemonic device, passwords should always be committed directly to your memory.
- Never save your passwords in plain text. If your passwords are saved somewhere on your computer, such as in a notepad on your computer’s desktop, anyone will be able to view them and log into your WordPress account. This also goes for post-it notes on physical desktops.
- Don’t give out your passwords to others. Though you may trust someone, that doesn’t necessarily mean that their password hygiene is up to snuff. When you give out a password, you run the risk that someone else might lose that password.
Remember: Passwords are the first line of defense you have when securing your WordPress account. Though they aren’t the only security you should rely upon, a well-crafted and well-maintained password can do much of the heavy lifting in terms of your system security.
Making Sure Your Password Can’t Be Reset
…At least, not without your knowledge. One substantial security risk involving passwords is the ability to reset a password. Other user accounts can be particularly bad about this; a malicious user might be able to reset your password simply by knowing a little about you, such as your birth date. WordPress requires that you have access to your administrative email account to reset your password. And that also means that your security is only as good as your email security.
WARNING! Anyone who has access to your email account can easily find a way to access your WordPress account — and can lock you out of both. Just as it’s important not to share your WordPress login information, it’s also important not to let anyone use your email account.
Locking Out Multiple Sign On Attempts
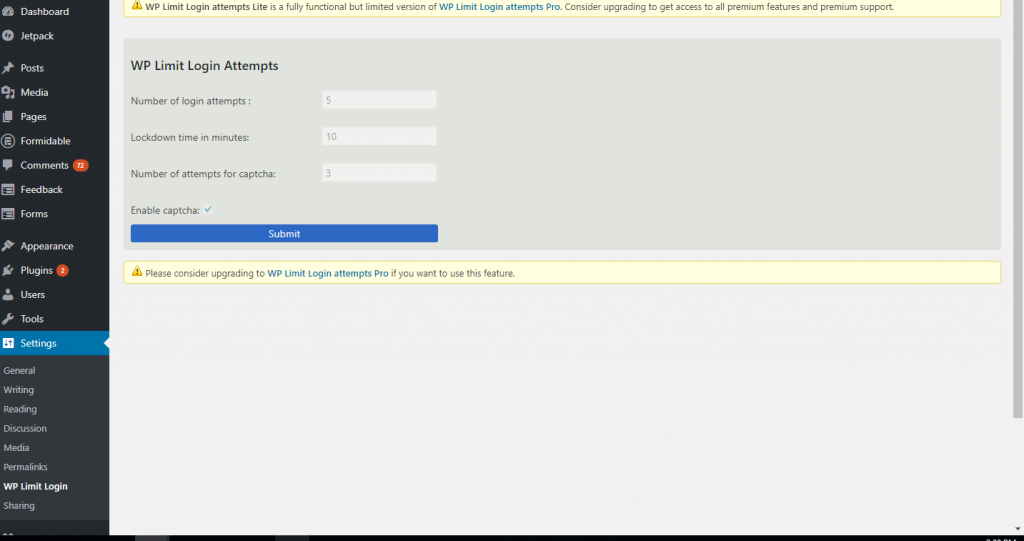
WordPress does not have built-in functionality for locking out multiple sign-in attempts. And that means that a persistent individual can sit there virtually all day just trying different username and password combinations. A login limiting plug-in will limit a user to a certain number of tries during a certain amount of time — such as three tries every hour. It can also permanently lock down a system (until properly unlocked) if a certain number of incorrect attempts are made. This can be achieved through the installation of a single-use plug-in such as WP Limit Login or a more comprehensive security solution such as Sucuri.
Installing WP Limit Login Attempts
Install and activate WP Limit Login Attempts, and then modify your settings:
- Number of login attempts: the number of attempts allowed before locked down initiates.
- Lockdown time in minutes: the amount of minutes the user will be locked out.
- The number of attempts for captcha: when a captcha will engage to prevent bot attempts.
- Enable captcha: whether you want to add a captcha at all.
YOU SHOULD KNOW: At any time, you can go to your plug-ins in the administrative dashboard and select “deactivate.” If your blog appears to be acting strangely or loading slowly, you may want to deactivate plug-ins one by one to determine which plug-in might be the culprit. Incorrect settings could lead to performance issues later on.
Chapter Three: Adding an Internal Monitoring System
Up to now, you may have noticed that securing WordPress involves a lot of small changes, management, and maintenance. You can bolster the overall security of WordPress through the use of an internal security monitoring system, which will actually make many of these changes on your behalf. Wordfence and Sucuri are two of the most popular management systems; though WordPress offers an official security plug-in, its uses are fairly limited.
Monitoring Security with Sucuri
Offering “complete website security,” Sucuri is able to both clean previously hacked websites and protect websites from attacks.
Sucuri is the leading commercial option for all-in-one WordPress security. For SMBs and professionals, Sucuri is likely one of the better options — it comes with a wealth of robust features that both protect your website while also reducing the amount of time you need to spend on setup and administration. Some of the most prominent features of Sucuri include:
- Site Cleaning. If you’ve already been hacked, Sucuri can restore your website and clean up any malicious infections. These features include the ability to reset the password of any user, reset existing plug-ins, and trace back potentially malicious activity.
- Site Reputation. If your site has already been blacklisted by Google or disabled by its host, Sucuri can detect this and help you become re-established.
- Site Protection. If you want to protect yourself from being hacked, Sucuri offers DDoS and brute force protection, in addition to protection against many current security exploits and vulnerabilities.
- SSL Certificates. Sucuri provides SSL certificates for their customers under their professional plans. SSL certificates make it possible to encrypt and protect your blog’s transmitted data.
- Advanced Website Protection. Sucuri scans, detects, and mitigates attacks against websites through their Website Application Firewall, including DDoS attacks and brute force password attacks.
- Scanning and Monitoring. Sucuri actively scans websites for signs that they may have been attacked, such as through malware or malvertising.
- Site Hardening. Sucuri additionally makes many changes to improve WordPress’s overall security, such as: updating WordPress and PHP, removing the visible WordPress version, protecting the uploads directory, restricting access to internal directories, updating and using security keys, and checking for information leakage.
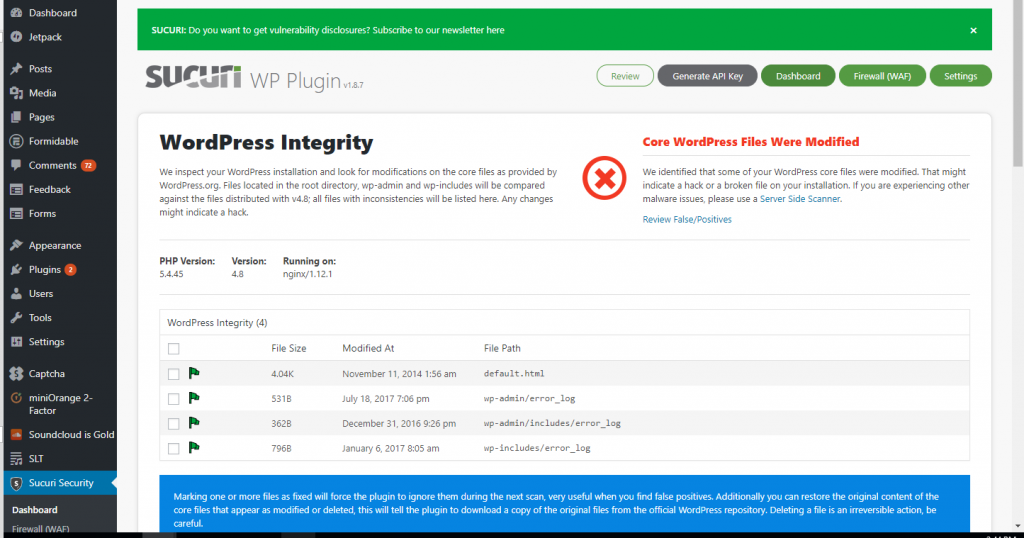
Sucuri is a comprehensive security plug-in that can be installed for free. To install Sucuri, download the “Sucuri WP Plugin.”
Click on “Sucuri” in your new administrative panel. Sucuri will first ensure that WordPress has not been modified in any way.
It will also make sure that the site is clean and it is not blacklisted.

Before going further, you will need to generate an API key. This will enable firewall protection. Simply provide your domain and email address to get started.

Once the API key is generated, you’re free to go through the Sucuri WP plug-in settings, which are comprehensive.

- Scanner. This system looks for changes that have been made to your WordPress installation. If you are experiencing issues with WordPress, you can consult with the scanner to find out more.
- Hardening. This feature goes over many of the changes that we have made and more, allowing you to automatically do things such as verify your PHP version, delete the default administrative account, and block PHP files in the wp-includes directory.
- Post-Hack. Secret security keys can be used to improve your security and authentication, and any user passwords can be reset, in addition to any installed plug-ins.
- Alerts. Here you’ll be able to control where security alerts go – generally to your administrative email account.
- API Service Communication. Your API key and its details are stored here – there shouldn’t be any changes that you need to make.
- Website Info. This contains all of the credentials and other information related to your website.
Monitoring Security with Wordfence
Wordfence is the leading “freemium” plug-in for all-in-one WordPress security, with a large inventory of free features in addition to paid options.
Accessible and affordable, Wordfence presently has millions of users across the globe. Wordfence provides firewall, malware scanning, and login security services, all designed to build on top of WordPress Core. Even the free version of the plug-in is relatively feature complete. Some notable features include:
- Web Application Firewall. The Wordfence Web Application Firewall detects attacks such as SQL injections, malicious file uploads, and DDoS attempts.
- Website Scanning. Wordfence can provide hardening for your website by detecting problems in its public configuration, backups, posts, comments, and passwords.
There are also some premium features available:
- Protection against spam. Wordfence can check comments against lists of known spammers in order to better detect and remove spam. This feature takes the place of plug-ins such as Akismet.
- Protection against blacklisting. Wordfence can additionally check to see if your website may be getting spammed to other sites. This is a commonly used tactic to get a website blacklisted; if Google sees your website being used in this fashion, it may remove you from search engine results.
- Rate limiting. Wordfence can limit high volume traffic to a certain rate so that users such as bots can still access the site but without interfering with its responsiveness. This can be especially useful to limit crawlers — bots that look through websites to index them for search engines.
Wordfence can adversely impact the performance of high traffic sites — but caching and better performance optimization can also be used to address this. In recent iterations, Wordfence has addressed and reduced its usage of overhead.
Monitoring Security with WordPress Security
WordPress officially provides some advanced security features through its WordPress Security plug-in — but the features provided are fairly rudimentary and shouldn’t be relied upon to secure an entire site.
You can obtain some basic security features through the use of Jetpack Personal or Jetpack Business, both of which include the official WordPress Security Plug-In. WordPress Security includes spam filtering, technical support, daily off-site backups, and one-click restoration. But it is not designed to monitor and protect against advanced threats. WordPress security is mostly designed to quickly deploy backups of your system in the event that something goes wrong. It can be very useful in the event that your website is hacked or that an employee makes a mistake that damages your site, but it is mostly responsive rather than preventative.
Chapter Four: Securing Your Web Hosting Account
Unless you are hosted directly on WordPress.com, your WordPress site is going to run on top of a hosting account. And that means that your hosting services are going to have to be just as secure as your WordPress installation. By gaining access to your web hosting account, an attacker can do anything they want — including deleting your website entirely.
Finding the Right Hosting Service
First thing’s first — you usually want to work with a secure WordPress hosting service that is either experienced with WordPress or specifically targeted towards WordPress bloggers. Not only will their server environments be well-suited to the needs of WordPress, but they will also be able to provide better security tailored around the system.
There are thousands upon thousands of hosting services available, and though they may seem to be identical, some of them are far safer than others. When looking for a web host, you should consider the following:
- Are they popular? Major web hosting services such as HostGator, DreamHost, and GoDaddy all have to have top-of-the-line security solutions because of the sheer number of clients that they have available. That doesn’t necessarily mean they are the best hosts (many of them have fairly limited resources), but they are more likely to be secure than other low-cost services.
- Is the account shared? Shared hosting packages may have additional security vulnerabilities, as multiple clients are in the same server environment. Most bloggers will not want to spend the money for a dedicated server, but they can still invest in a VPS (virtual private server) to reduce their risk.
- Do they have built-in security features? A reputable hosting service will discuss the security features they offer, such as complimentary SSL certificates, automated backups, and firewalls.
As with many things, you don’t want to go with the most affordable hosting service. Look for a good blend of features and reputation; there are many very cost-effective options that aren’t necessarily bottom tier.
Adding External Monitoring Systems
Monitoring systems, firewalls, and scanners can all be used to protect your website from intrusion attempts. Popular options include Cloudflare and Sucuri, and some web hosts also provide their own utilities. These solutions are designed to detect, identify, and mitigate threats. They can recognize potentially suspicious traffic and deny it — while still keeping a website up and active.
External monitoring systems are particularly useful against DDoS attacks. A monitoring system will be able to identify a DDoS attack and will be able to deny all illegitimate requests while still allowing ordinary traffic to flow through. External monitoring systems can also be used to detect and reject potentially unsecured connections.
What’s a DDoS? In a distributed denial of service attack, a cyber-attacker uses multiple devices to continually create connections to a target. Eventually, the target — in this case, your WordPress site — becomes so inundated with requests that it can no longer respond, even to legitimate ones. This is one of the easiest and fastest ways to take a website down.
Cloudflare is a particularly useful tool for WordPress bloggers. Not only does it protect against DDoS attempts and detect potentially malicious traffic, but it operates primarily as a Content Delivery Network. A CDN speeds up a website by caching its data; users will be able to access the website much faster, and there will be less load distributed to the server. Cloudflare is also completely free and can manage multiple sites at once, additionally providing analytic data through which you can measure your website’s traffic and performance.
Setup an SSL Certificate and Configure WordPress
SSL certificates can get a little technical — all you really need to know is that using an SSL certificate means that your data is going to be encrypted. And that means that people who are seeing your data being transmitted won’t be able to read it. Many websites you use probably use an SSL certificate. You can usually tell because there will be a “locked” icon by the URL and the URL will start with “https://” rather than “http://.”
Not all hosting accounts will come with an SSL certificate. You may need to purchase one through your web host as an add-on — or you may need to use a security plug-in that comes with one, such as Sucuri. Your web hosting service will be able to install the SSL certificate on your account but either way, you’ll need to configure WordPress to use SSL. If you want to purchase SSL separately, you can go with different brand options/SSL types, including GeoTrust SSL, multi-domain wildcard SSL, Thawte cert, or Sectigo SSL. Paid SSL offers exciting features that typically make the purchase worthwhile.
How to Add SSL and HTTPS to WordPress
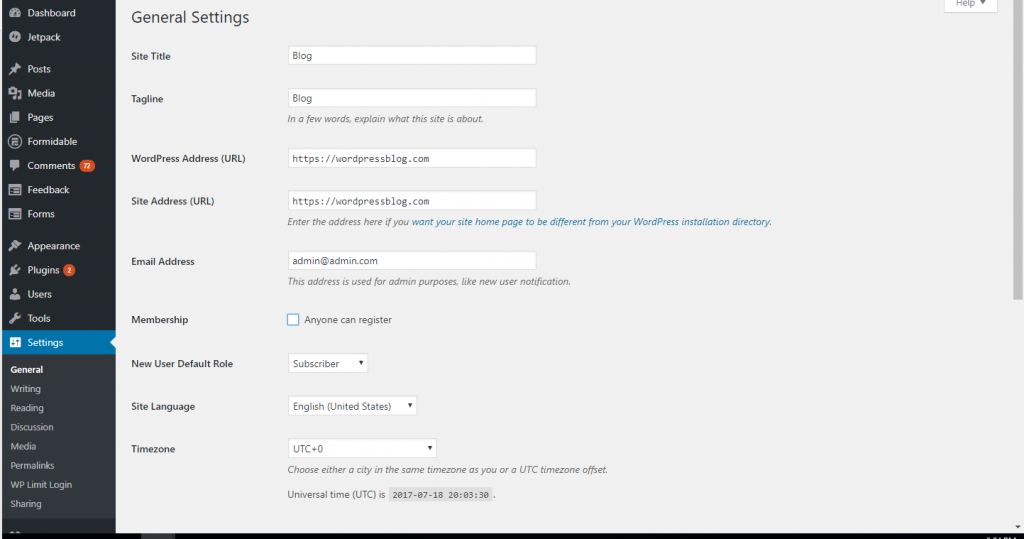
Click on your “General” settings in your administrative dashboard.
Change your WordPress and Site Address URLs to “https” rather than “http”.
If you have already added content to your WordPress site, you may also need to include a redirect. For this, you will need to browse to the main directory of your web host. This is usually called “htdocs,” but may also be your website’s name. Here you will want to modify a file called “.htaccess” to include the following text:
RewriteEngine On
RewriteCond %{SERVER_PORTZ} 80
RewriteRule ^(.*)$ https://www. will be the domain of your blog. This will redirect any requests to “http” to “https” automatically.
Update Your File Permissions
File permissions tell your web server who is allowed to view and access each of your website’s files. By default, WordPress is often installed with “777” permissions for its directories. Though FTP, you can select these directories, right click, and change these permissions to either “750” or “755.” While everyone will be able to edit these files, modifying them and deleting them will require additional permissions.
Your wp-config.php file should be set to “600,” and the files within your WordPress directories should be set to “640” or “644.” These permissions will still let you do anything you need to do; it will simply reduce the chances that someone else could alter or delete your files.
Turn Off PHP Error Reporting
By default, many servers will send out an error message if PHP code fails — and WordPress is written in PHP. These errors are designed to help developers when they are debugging, but because they can expose parts of your website’s code, they can also be a substantial security risk. To address this, you need to turn off PHP error reporting. In the event that PHP does encounter an error, it will simply send a blank page.
This requires a modification of your wp-config.php file, which can be found via FTP (or a file browser) in the base directory of your WordPress installation. At the top of wp-config.php, below the first line, you should put:
error_reporting(0);
@ini_set(‘display_errors’,0);
Of course, this also means that you aren’t going to know what specifically failed in the event that your website does fail — and, in that situation, you might need to temporarily toggle errors back on.
Chapter Five: Protecting Against Your Users
Bloggers often run in packs. If you’re running a blog that has multiple contributors, then your greatest threat might not be from the outside — it may actually be your own users. Users tend to make mistakes; in fact, when businesses are hacked, it’s almost always internal. 52% of cyber attacks occur due to system failures or human error.
The Importance of Restricting Permissions
In security, there are things that are called “best practices.” These are the things that we do in an ideal world to create the lowest risk environment. One of the most important security best practices is to restrict user permissions to only what they truly need to complete their day-to-day tasks. When you do not restrict permissions appropriately, you run the risk that:
- A single user could cause substantial damage — either intentionally or accidentally. There is no reason for a contributor to be able to delete another contributor’s posts, but they might start to do so if they think those posts were inappropriately filed under “their account.”
- A single-user login breach could become more dangerous. If a malicious user gets into a contributor’s account, they are fairly limited in the amount of damage they can do. If a malicious user gets into an administrator’s account, there’s far more potential for damage. The fewer users there are with administrative powers, the better.
It’s also a good practice not to assign temporary permissions — i.e., not to make a user an administrator for a temporary amount of time to make some adjustments. Though this is commonly done to make a job simpler, it can easily be forgotten later on.
Setting Password Restrictions
Thanks to Chapter Two, you now know how to set a good password. But that doesn’t necessarily mean that your users do. When left to their own devices, users could set very simple passwords that will easily be cracked — and that compromises your entire system. To avoid this, you can set up restrictions regarding the passwords that your users can set.
The most important factor you want to look at is length, but you also want a decent variety of characters in addition to alphanumeric ones. You may want to request at least one number (0-9) and at least one special character (_;,/`~*). Keep in mind that very restrictive password combinations actually tend to work against you rather than for you, as users will be more likely to create passwords that are difficult to remember. Difficult to remember passwords will need to be either written down or reset.
By default, WordPress core ensures that users have “strong” passwords and tests passwords for their complexity. If you have a current version of WordPress, you may not need to worry about this. But if you need to add this functionality, you can use a plug-in such as Force Strong Passwords.
Managing User Sign-Ups New users should always be restricted to a “contributor” status, and for the best security, they should have to be manually approved. Letting users create their own accounts can be dangerous otherwise!
Log Out Idle Users
Users sometimes forget that they’ve logged into their accounts. When they do this, they expose the blog to tremendous risk — anyone who is on the same computer and wants to tamper with your website can. To deal with this, you can install a plug-in that will automatically log users out after they’ve been idle for a certain amount of time.
The most popular way to do this is through the Idle User Logout Plugin. This plug-in lets you select which roles will idle and how long it will take them to log out when idle. Users won’t lose their data; they’ll simply need to log in again before they can continue making adjustments.
Chapter Six: Protecting Against Third-Party Utilities and Services
There are two third-party threats that you need to be most conscientious of third-party plug-ins and third-party advertising networks. Both of these can add content and programming to your website that could either damage your site or harm your users.
Validating Third-Party Plug-Ins
Plug-ins for WordPress are generally guaranteed to be malware free; otherwise, they would not be included within the WordPress repository. However, that is not the major concern — the major concern is that these plug-ins may not be as secure as they should be (perhaps they’re outdated). Anyone can write and publish a plug-in, including an inexperienced developer who could potentially create a plug-in with security vulnerabilities. If part of your website is vulnerable, all of your websites are vulnerable.
Before installing a third-party plug-in, you should ask yourself the following questions:
- How many reviews does it have, and how high is it rated? You should avoid plug-ins that appear to have been barely used or that have just been published for the first time; they could have security issues that have not yet been discovered.
- How polished are the plug-in and its documentation? The more documentation a plug-in has, the better — that means the developer is being conscientious and mindful of its design. Likewise, a plug-in that is visually polished will likely have been produced by someone who is detail-oriented.
- How many other plug-ins have the developer released? The more experienced the developer is with WordPress, the more likely they are to produce solid, secured plug-ins for the platform. If they haven’t released any other plug-ins, they may not be aware of WordPress’s unique security environment.
Avoiding Malicious Third-Party Services
The most common type of malicious third-party service has to do with “malvertising.” Malvertising refers to advertisements that actually contain malicious code. Many bloggers fund their blogs through the use of third-party ads. Malvertising targets the users rather than the owner of the blog themselves, but it can also get a blog blacklisted if the malicious code is detected on their site. There are a few ways to avoid these products:
- Only use popular services. Google Adsense and Bing Ads are two of the most popular networks, but that doesn’t mean they won’t ever contain malicious code — it just means they are less risky.
- Invest in a monitoring solution. As noted, even popular third-party networks can be infested, especially if the malicious attacker is using a previously unknown vulnerability. A monitoring solution will identify malicious code when it is run on your site rather than trusting the service to detect it.
- React quickly to potential threats. If you do suspect that malicious code is being run on your site, it’s important to address it immediately — even if that means taking down your advertising while you figure the situation out. Otherwise, you can lose traffic and damage your website’s reputation.
Identifying Potentially Harmful Plug-Ins or Themes
The Internet is a vast and wide place, and sometimes when looking for plug-ins or themes, you can be directed to individual websites or repositories that promise some of the most popular WordPress tools – especially when you consider that there are over 10,000 themes. But whenever you are promised something for free, it’s likely that there’s a catch. In the case of plug-ins or themes, the catch is often a virus.
When purchasing a premium plug-in or theme, it is important to go through the WordPress.org repository or a trusted corporate site. There are many websites that promise premium plug-ins or themes for free. These assets have been stolen — and even if they don’t include malicious code, it still won’t be legal to use them.
Only Installing the Plug-Ins You Need
Though plug-ins can add some fantastic functionality, they may not always be strictly necessary for the operation of your blog. Think critically about each plug-in that you install; each one isn’t just a security risk, but will also consume the overhead of your website and ultimately slow it down.
Chapter Seven: Computers, Connections, and the Internet of Things
Consider an encrypted, password-protected hard drive and a thief who wants the data that is held within it. It would take days or weeks for the thief to hack into the hard drive — and the thief only has a few minutes of time. What does the thief do?
The thief picks up the hard drive and walks away with it.
Protecting Your Blog Against Physical Intrusion
Today we have smartphones, tablets, and laptops, all connected to the Internet and connected to your blog. Losing any one of those items could mean compromising your blog unless you make sure that you’ve taken the appropriate steps to protect yourself. These are:
- Always make sure that your devices are secured. All of your devices should be protected by either a PIN or a password — and, where applicable, you should use two-factor authentication such as a fingerprint reader or an ocular scanner. Your devices should automatically lock after a certain amount of time so that they will password protect themselves when they are idled.
- Don’t use public computers to access your blog. You never know what could be on a public computer, and you can never be too cautious. If login information is stored on that computer, someone could use that computer to log in as you. Likewise, you shouldn’t log into your email account either — because it could contain information that could be used to access your blog.
- Never access your blog through public WiFi. A public WiFi connection can be run by anyone… including people who are trying to look at your data or insert malicious code into your data transfers. SSL largely helps with this by encrypting your website’s traffic, but there can still be potential vulnerabilities related to a public WiFi connection.
Chapter Eight: Constructing Your Disaster Preparedness Plan
It’s the blogger’s worst nightmare: what happens when your site goes down? Do you know where your backups are? How quickly can you deploy them? And how current are they? In order to avoid downtime, you have to be able to answer these questions quickly and reliably.
What is a Disaster Preparedness Plan?
A disaster preparedness plan outlines the steps that you need to take to get your website up and running again after it has been taken down. And your website could go down for any reason: your blog could be hacked, your hosting provider could go out of business, or you could even make a mistake leading to data loss.
At its most fundamental, a disaster preparedness plan usually involves backup solutions and how to redeploy your blog’s data. But a disaster preparedness plan might also include failover services, such as the ability to redirect your traffic somewhere else while you are down or the ability to notify your readers that there may be problems.
In general, it’s a good idea to:
- Have a temporary page in place that will tell your readers that your website is down and that it is expected to be back up by a certain time.
- Know where to find your current backups and how to restore them as quickly as possible.
Be able to start and restart services that your website depends upon, such as your web service or your database.
The Four Best Practices for Website Backups
- Backups should be automatic. Don’t rely upon manual backups; there will come a time when you’ll forget. Schedule your backups to run during the lowest traffic hours of your website (as they do consume some system resources), and make sure that they are running as scheduled. Don’t forget to check on them frequently; they could fail if they run out of storage space.
- Backups should be incremental. You should always have monthly, weekly, and daily backups to fall back on. You never know when an intrusion could occur — or when data could be lost. It’s very possible that you might find yourself having to go back several days or even several weeks to completely restore your site.
- Backups should be redundant. Never store your backups only in one place. Cloud backup solutions are especially useful because they are naturally redundant… but what happens if you lose access to the service provider? Ideally, you should have backups both through your web host and through a secondary service.
- Backups should be elsewhere. Your backups shouldn’t only be stored on your host; that’s a recipe for disaster if your hosting account itself is hacked. Likewise, you don’t want your backups to only be on a local or external drive — what happens if that drive crashes?
Options for Backing Up Your WordPress Site
- Your web hosting service. Most web hosting services offer their own backup system, which should be used as a secondary backup option. But don’t assume that your web host automatically does it. Notably, VPS systems (virtual private servers) usually leave it to you to install a backup solution manually.
- A cloud-based backup solution. There are subscription-based backup solutions that are located on the cloud, which can take backups automatically from your system. WordPress offers cloud-based backups through its WordPress Security plug-in.
- As a feature in comprehensive security plug-ins. Security plug-ins often include the ability to manage your backups, as this is a part of managing security and mitigating potential risks. Sucuri has a particularly comprehensive backup and restoration system.
An ideal backup solution will backup your website both on your website host and on a cloud solution. This gives you multiple options to recover your data and allows for almost immediate re-deployment of your site should data be lost or corrupted.
Chapter Nine: Managing and Monitoring Your WordPress Site
Your job isn’t over once you’ve configured your website and installed your tools. Your WordPress site will also need to be managed, monitored, and maintained over time. If you want to keep your website secure, you’ll need to update it regularly and defend against new and technologically advanced threats, which is truly an advantage of WordPress because it ensures your page will be regularly well-defended.
Keeping Your WordPress Site Current
You may have noticed that WordPress updates itself quite frequently. These updates concern more than just functionality and improved workflow — they also address new and emerging security threats. Despite being similarly secure, comparing CMS platforms like WordPress vs Drupal shows WordPress coming out on top due to its ease of maintanance. In short, updating your WordPress site frequently is critical to maintaining a healthy security ecosystem.
Some security plug-ins, such as Sucuri, will routinely check to make sure that you are running the current version of WordPress. And though hiding your WordPress version can protect you from some threats, other more persistent cyber criminals may not be fooled.
Abandoning Out-of-Date Plug-Ins
WordPress tracks which plug-ins have been frequently updated and which plug-ins have not been tested with current versions. Plug-ins that are not kept current should be replaced with plug-ins that are, even if the newer plug-ins might not offer the same functionality.
Older plug-ins will have the same issues as older WordPress installations; they could contain vulnerabilities that have been identified. Once a vulnerability has been identified in an older system, all a cyber-criminal has to do is look for a blog that’s still using that old system.
Keeping Your Site Clean
Websites evolve. Over time, you’ll add or remove content, install or uninstall plug-ins, and change themes (occasionally switching to light and efficient themes like GeneratePress). Whether you’re a WordPress expert or not, keeping your site clean is essential and all about deleting anything not in use: inactive plug-ins, old themes, and other unnecessary content.
Not only are these inactive items taking up space and other resources, but they could actually still represent a security risk even if they have already been deactivated. Plug-ins, in particular, need to be completely deleted in order to remove their risk. Otherwise, they will still be on your server, and their scripts can still be used.
Testing Your Site’s Vulnerabilities
Security Ninja is a powerful WordPress plugin that lets you run numerous security tests probing the defenses and vulnerable areas of your site. The plugin is entirely automated – push the button to run the tests. Its free version includes more than 50 tests on brute-force attacks, file permissions, version hiding, 0-day exploits, database configuration, WP core version, plugin updates, PHP and MySQL version, and more. Security Ninja free does not make any changes to your site – it just shows where you need to improve.
Its paid version adds seven modules that check and fix the vulnerabilities. Core Scanner checks your WordPress core files and restores the ones that have been modified illegitimately. Malware Scanner checks your themes, plugins, and files for malicious content, while Events Logger tracks what you and your users do on your site. Database Optimizer cleans the garbage out of your disk space. Auto Fixer automates backups and code edits, while Cloud Firewall blocks malicious IPs.
Conclusion
Though it may seem that securing WordPress is difficult, it’s really just a matter of being thorough and vigilant. “Hardening” WordPress does require that you go through certain configuration steps — and that you install security-related plug-ins. But once you have properly secured your WordPress installation, it should mostly be able to take care of itself. Moving forward, your blog will be able to protect itself… and you’ll know what to do if it ever cannot.
Security plug-ins such as Sucuri and Wordfence can take a substantial amount of burden off of you as the blog owner. Both Wordfence and Sucuri will commit many of the above-mentioned configuration changes on their own — and will be able to monitor and manage your website 24/7. By automating parts of your WordPress security, you’ll both be able to improve upon its accuracy and reduce the amount of time you need to spend on site administration.
There are countless threats out there — and there are many reasons why a malicious attacker might target a WordPress site. With cyber criminals rapidly becoming more persistent and threatening, it becomes necessary for bloggers to be proactive about their security solutions. A proactive blogger will be able to protect their blog’s data against even some of the most advanced threats.
Through this eBook, you will have hopefully learned all of the information that you needed to learn about hardening WordPress — but the world of security is also always changing. If you want to make sure that your site is secured in the future as well, you will need to remain current on modern security threats and solutions. The job of a blogger is never over as far as website maintenance and security are concerned.
But by properly securing your website, you’ll be able to build traffic faster, develop a solid reputation, and sidestep many of the costly issues associated with having a website taken down or otherwise compromised. Securing your website is one of the first steps toward developing a solid blog that will be able to grow steadily in popularity. A secured blog will have minimal downtime and will be able to serve its user base both better and more consistently.
That’s it. Now happy blogging!